Disclaimer: Neither the author of this post nor the FPP, claims any liability for any damage done to yourself or others by using the chemistry or following the instructions in this post. Proceed at your own risk. Note that the FPP can develop and scan your home movie film.
So, you’ve decided to give black and white reversal movie film processing a go? Congrats! It’s a lot of fun, and the results are always satisfying. If you’re like me and you shoot a lot of black and white reversal movie film, doing it at home in your dark room will be life-changing. The amount you’ll save in processing costs will allow you to spend more money on film and less on pricy labs. The amount you’ll spend up-front to buy some of the equipment will seem like a drag, but if you shoot enough movie film and do the math, it soon starts to pay for itself.
You may have already seen some videos or read some articles on the net that go through the steps but, if you’re like me, you probably feel overwhelmed. There is either too little information, or too much—and then too many decisions to make. I’m approaching this little how-to from a ‘here is my method and it works best for me’ perspective. There are lots of other ways to approach black and white reversal movie film processing. I encourage you to try everything—but through my trials and errors, these methods have proved perfect for me.
Before we get into the nitty gritty here’s one thing you should know: if you want lab quality results—and I mean Steven Spielberg quality results—go to a lab. Processing move film at home is going to yield different results than if you were sending your movie film off to a big lab—the methods are scaled down, and unless you have an unlimited budget to spend on huge industrial equipment, you’ll never get your film EXACTLY like the big labs do. That being said, I’ve had extremely good results processing at home, and usually find it hard to compare my own developed film with that of the labs. But hey—that’s just me.
I’m going to assume that if you’re reading this, you already have a dark room, so I’ll spare some of the supplies from this list for the time being—or just assume you already have them.
This guide will also cover steps for the major formats: 16mm, Super 8mm, and Regular 8mm. But you could also apply the developing steps to 35mm still film, too!
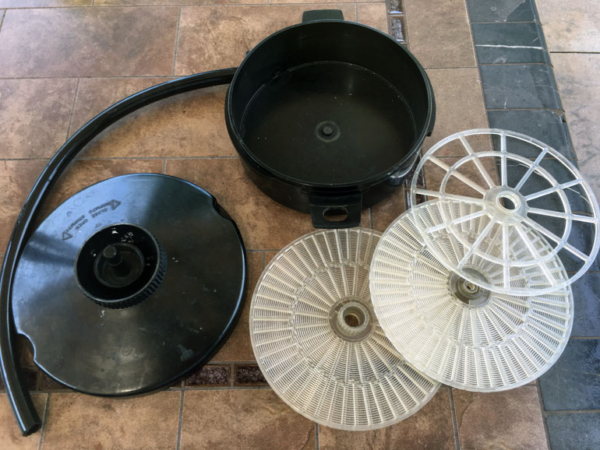
above: A Lomo Processing tank.
Supplies
- Processing chemicals (we’ll get more specific in a bit)
- Mixing containers—up to 2 liters—they need to be plastic or glass.
- Something to stir chemicals with (a plastic or glass spoon will work great—NO WOOD OR METAL)
- Containers to store chemicals (you’ll want plastic containers—stay away from glass)
- Rubber gloves (chemical safe—that will go up to near your elbow)
- Safety goggles (GOGGLES not GLASSES–seriously—these are non-optional)
- Rubber or plastic apron
- Ventilation mask (more on this later)
- A Lomo processing tank (more details below)
- Movie-film drying rack (you can get creative here)
- Lomo slitter (for regular 8 movies)
- Splicer (needed for 16mm or regular 8 movies)
- Press tape or film cement
- Empty spool
Chemicals
Everyone is going to have a different opinion on which chemicals to use for your black and white reversal films. You can try which every you like, but I’ll list what I use below. The chemicals I use have had great results with FPP Cine8 40 BW, Kodak Tri-X, and ORWO UN-54.
Many of these chemicals are EXTREMELY DANGEROUS. In fact, you’ll need to fill out a DEA form just to order your bleach chemicals. When mixing or working with any of these chemicals at any step in the process, you need to be wearing safety goggles and gloves. If you’re working with the chemicals in powdered form, you also need a ventilated mask—not just a flimsy paper dust mask.
I’m not just saying this to be ‘careful’ I’m saying it because these chemicals could do serious damage to your health—especially the ingredients for the bleach.
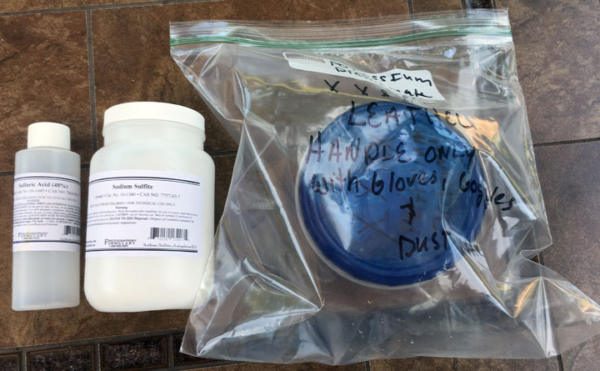
Developer (1 gallon)
You’ll want to order a 1 gallon kit of Substitute D-19 from Photographers’ Formulary (item 01-0036 D-19 1GL.) It’s about $25.00. This is actually a reformulation of Kodak’s old D-19 chemical that they stopped selling. It’s a great general use developer that will work on Fomapan R100, FPP Cine8 40 ISO BW, Kodak Tri-X, and Orowow UN-54. It’ll come in powdered form in several different packets that you’ll need to mix.
The package will include the steps to mix this developer into one gallon. FOLLOW THE TEMPRATURES PERCIESLY or else the chemicals won’t mix. Be sure to mix everything in either plastic or glass containers with plastic or glass stirrers. Never use organic materials such as metal or wood (this is true for all your chemicals.)
Why do you need a gallon of developer and only 2 liters of everything else? Well, that’s because you need about 1.5 liters to properly cover the film in your Lomo tank—and Photographers’ Formulary only sells kits to make a gallon or 1 liter!
Bleach (about 2 liters)
This is where things get serious—you’ll need to make sure you are very careful with your bleach and the ingredients to mix it. You’ll need to whip up a batch of Dichromate Bleach. This is the only bleach I’ve found that will properly bleach Fomapan R100 and the other films I’ve mentioned. It works great, and will last you many, many rolls. You can order both the Sulfuric Acid and the Dichromate Bleach at Photographers’ Formulary.
For Dichromate Bleach you’ll need
70ml Sulfuric Acid 48%
15g Potassium Dichromate (EXTREMELY TOXIC—ESPECIALLY IN POWERED FORM)
1500ml Distilled Water @ 20°C
Measure 1500ml of distilled water and get it up to 20° Celsius in a large plastic or glass mixing jug. Then, measure out 70ml of sulfuric acid. Add the acid to the water (NEVER ADD WATER TO ACID) carefully and slowly, stirring with a glass or plastic stirrer. Wearing goggles, apron, gloves, and facemask, carefully measure out 15g of potassium dichromate, making sure to completely clean up the area of any dust afterwards. Use damp towels to wipe off the surface and dispose of the cloths or paper towels immediately. Carefully mix the Potassium Dichromate into the water solution until it is completely dissolved. Carefully return to storage container.
Again, Potassium Dichromate is extremely hazardous in its powdered form. Make sure it is stored safely and away from anything that could get into it—especially since it looks like bright orange sand—this stuff is no joke!
Clearing Bath
Clearing agent is super easy to mix and super cheap. All you’ll need is Sodium Sulfite Anhydrous, and water. This stuff is not nearly as toxic as your bleach or developer
1500ml Distilled Water @ 20° C
140g Sodium Sulfite (anhydrous)
Bring the water up to temp in a large mixing jug. Measure out 140g of sodium sulfite and add to water, mixing carefully until completely dissolved. Return mixture to storage container.
Fixer
I use the good old classic Kodafix—but you can use just about any normal rapid fixer.
Wetting Agent
Just like in still photography, you’ll want a drop or two of this once your film has completed its final rinse. I use Kodak Photo-Flo.
Containers
For these specific instructions, you’ll need a 1 gallon jug and several two-liter jugs. You can also buy these from Photographers’ Formulary or wherever else you get your dark room containers from. Just be sure they are sturdy and plastic. I DO NOT recommend using glass. If, for example, you drop your bottle of Dichromate Bleach and it breaks—you’re in for a REAL mess and a dangerous situation. That’s why I feel plastic works best.
Safety Supplies
You need chemical-safe gloves (I recommend these) that will at least cover near to your elbow. These chemicals are much more dangerous than some of the chemicals you use to process your still black and white film—especially the bleach. You should wear them at all times.
You’ll also need goggles, not just safety glasses. Something that will completely cover your eyes and the sides of them.
When you mix your powdered chemicals, you’ll need a ventilated mask (like this one) NOT just a standard dust mask (like this one.) Potassium Dichromate is extremely toxic in powdered form, and if inhaled even in the smallest amount, can put you in the hospital.
You should also wear an apron made of plastic or rubber.
Lomo Processing Tank
This is what you’ll load your film onto. The UPB-1 tank is what I use, and it was manufactured by a Ukrainian company called Lomo. The tanks are no longer manufactured, so you’ll likely only find yours on eBay. Besides your chemicals, this will likely be your biggest investment. Almost all of them are still being sold out of Ukraine or Russia, so it’ll take a few weeks to get to you. I know that ordering items from this part of the world may seem scary, but I’ve never heard of anyone getting shafted on one yet.
The UPB-1 has a reel inside that can handle up to 2 50ft rolls of Super 8, two 33ft (un-spliced) rolls of Regular 8 film, or a 100ft roll of 16mm film (though you’ll have to split it in half.) It can do this because the reel has an upper and lower section. This is why you’ll need the 1 gallon D-19 kit, as you need about 1.5 liters to cover the film completely. Each section holds 50 feet of film in either Regular 8, Super 8, or 16mm. For your 100 feet of 16mm film, you can just load one section on, cut it, then load the second 50 feet on top. Then, you can splice the two halves together after processing.
If you want a 100 ft. capacity reel, Lomo made those tanks too—but if you thought the UPB-1 tank was expensive, just you wait.
Movie Film Drying Rack
A few manufactures (like Lomo) actually made racks specifically designed for drying movie film in home labs. If you have a few bucks lying around, by all means, buy one. However, you can get creative, here. I use a drying rack like this to dry my film and it works perfectly. Some people also use string and paper clips to hold their film up to dry. Just remember, keep your film from touching the ground to keep scratches away, and make sure it’s not drying by a window or outdoors (you’ll get a lot of dust on your film that way!
Lomo Slitter (Regular/Standard 8mm Film only)
If you’re developing Regular 8mm film, you’ll need to slit it down the middle—Lomo made these slitters to do just that. You insert one end through the opening following the arrows and then pull it through. Then, splice the two ends together either using Kodak press tapes and their Universal Splicer, or a splicer that uses film cement. Just be sure to do this on a scratch free service to avoid scratches.
Empty Spools
Don’t forget you’ll need a spool to put your film onto! You can get bulk lots of empty spools on eBay for practically nothing, but if you’re looking for more professional grade stuff, I recommend Urbanski. If you plan on projecting your film, invest in some film leader, too.
Ok, so now you have all your supplies, you’ve got your safety bits, and you’ve got your chemicals mixed. Now we’re ready to start processing.
This guide is going to cover what you’ll need to do to process Regular 8/Standard 8 film—the steps are pretty much the same if you process Super 8 or 16mm except the loading of the tank (when loading 16mm film, you’ll need to cut your 100 foot roll in half) and the slitting part (you have to slit regular 8mm in half to make a 50 foot roll) If you’re developing Super 8 film, you just have to load your film on, process, dry, and you’re ready to put it on its spool!
Step 1 – Temp Your Chemicals
All of your chemicals will need to be around 20°C. If you need to bring the temp up, fill a large plastic bin or cooler (that you’re okay with sacrificing for your darkroom) and fill it with temped water. Then place your bottles inside and monitor the temp. My basement keeps my chemicals right around 20° and I’ve never had any issues.
Step 2 – Put your chemicals in order
I put numbers on my chemical bottles so that I never forget which comes next. Put your chemicals in order starting with developer, bleach, clearing, fix, and wetting. That way, you never get out of order (which sucks—I made that mistake once!)
Step 3 – Prepare your Lomo tank and load
Depending on which size film you’re loading it, you’ll need to adjust your tank reels accordingly to fit the format. Then, you’ll load your film onto the reels. I HIGHLY suggest using some junk film to practice with in daylight first, then once you’ve mastered that, head into the darkroom. This step is hard to describe on paper, but this video is how I learned. Then, practice filling and draining plain water through your tank so you can get a hang of how liquids are loaded and unloaded from the tank.
The cap/top/lid of the tank will stay secured and light-tight (until about 1-2 mins into the bleach phase when you can inspect the film.) Loading of the tank should be done in complete darkness, just like any other film.
Step 4 – Developer (8 mins)
Now that your tank is loaded, you’re ready to start development. BEFORE YOU POUR CHEMICALS IN be sure that your tank hose is pointing upwards towards the ceiling. The Lomo tank drains through the hose, using gravity. If you don’t place the hose upright, it’ll just pour out and you’ll end up with a mess. You should also place a large towel under your tank, to catch any drips or spills.
Add your developer to the tank and start your timer for 8 mins. I’ve found that 8 mins is the magic number for D-19 and Foma R-100, Tri-X, and Orwo UN-54. Every 30 seconds or so, you’ll turn the reel nob about 90 degrees and giggle it a bit for about 5 seconds. The jiggling action helps to remove any bubbles from the film from pouring the chemicals into the tank. Repeat every 20 seconds or so. How often you jiggle the knob (no jokes please) and for how long (allegedly) affects the sharpness of the end result. The times mentioned have worked best for me.
Once the time is up, carefully return the developer to its storage container.
Step 4 – Rinse (3 cycles)
Once you’ve returned your developer to its bottle, rinse the tank out using tap water as close to 20° as possible. Fill the tank up with water, agitate the spindle several times, and drain. Repeat 2 to 3 times.
Step 5 – Bleach
You should already be wearing your safety goggles, apron, and gloves at this point but if you aren’t, DO IT NOW. Bleach is nasty stuff!
Add bleach to the tank carefully. Set your timer for 7 mins, and agitate constantly. After the first 1.5 mins, you can remove the top of the Lomo tank and inspect the film in normal light. Remove the lid and rinse the lid immediately. Carefully remove the reel with the film from the tank, making sure not to drip and bleach on yourself or your work area. Inspect the reel and film—the film should show faint yellow images on a clear base. After the quick inspection, replace the reel to the tank and continuing agitating until the 7 mins are up.
Carefully return the bleach to its storage container. (I recommend replacing the lid to do this)
Step 5 – Rinse (3 cycles)
Once you’ve returned your bleach to its bottle, rinse the tank out using tap water as close to 20° as possible. Fill the tank up with water, agitate the spindle several times, and drain. Repeat 2 to 3 times. Insure that no yellow color remains in the water from the bleach. It should rinse completely clear.
Step 6 – Clearing
Add your clearing bath to the tank. Set timer for 2 mins and agitate the spindle every so often—every 30-40 seconds is fine. Inspection of the reel should show less yellowish images on a clear base.
Once the 2 mins are up, carefully return the clearing bath to its storage container.
Step 7 – Re-Exposure
Take your reel of film and (making sure it’s not dripping) place the reel directly into the light of an electric bulb for 2 to 3 mins, making sure to move the reel around the light to insure every inch is exposed, top and bottom. This is how the ‘reversal’ process is started!
Return the reel to the empty tank once re-exposure is finished.
Step 8 – Second Development
Now comes to true reversal step!
Add developer back to the tank again and set the timer for 5 mins. Agitate the same as you did for your first developer. Inspection of the film should show a darker base with black or dark grey images.
Once the time is up, carefully return the developer to its storage container.
Step 9 – Fixer
Add your fixer to the tank. Set timer for 4 mins and agitate the spindle every so often – around every 30-40 seconds.
Once the time is up, return the fixer to its storage container.
Step 10 – Rinse
Rinse the tank and reel in running water for about 5 mins. The water should be slightly warmer than normal—around 22-24°C.
Step 11 – Wetting
Keep enough water from the running rinse to cover the reel. Add a drop or two of your Photo-Flo to the tank and agitate very carefully for 1-2 mins.
Once the time is up, dump the water and wetting agent down the drain.
Step 12 – Dry
Dry the film on a clean and dust free surface. Be sure to leave film slightly loose, as it will shrink during drying.
Step 13 – Slitting (FOR REGULAR 8 OR DOUBLE SUPER 8 ONLY)
If you’re developing Regular 8 or Double Super 8, you’ll want to run your film through the Lomo slitter. Be sure to do this on a non-abrasive, dust-free surface with gloves. Carefully insert one end of the film into the slitter and push through until it comes out the other side. Grasp the newly slitted end and pull the remaining length of film through the slitter. Splice the two ends together and place on a reel for scanning or projection.
And that’s it! You’re done!
I hope you have fun developing your first roll of black and white reversal movie film.
This process also works for still films too—you can process (in theory) just about any black and white film into reversal. However, note that you’ll likely have to adjust your development times for those films.
Owen M. McCafferty II is a native Clevelander whose story with film photography began at a young age when he came across his grandfather’s Super 8 camera hiding away in his grandmother’s basement. His curiosity turned into an obsession, and he’s been a loyal film user ever since. He’s been processing his own still and movie film since the age of 12, and continues to advocate for affordable and accessible entries into the art of traditional film photography. When he’s not shooting a camera, he works as an Experience Designer for a Cleveland based firm, in addition to running a small genealogy business. You can visit him at www.OwenTheGenealogist.com