Well it was bound to happen!
I finally jumped in!!!
I got a Large Format camera, loaded, shot, and developed!!!! It worked!!!!!
Blog by Alex Luyckx
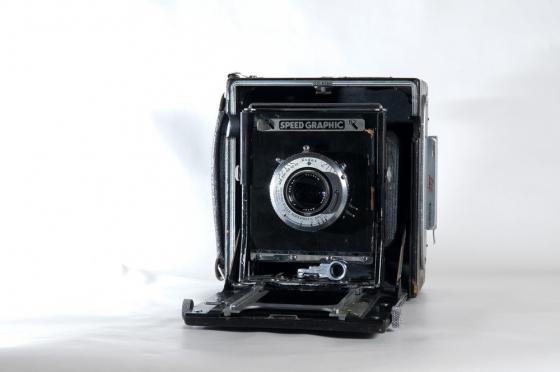
Back at the end of February I took a trip down to Rochester, NY with my friend Chrissie to visit our friend Andrew, Jenny and her Husband Aaron to check out the Rochester Subway and the Genesee Brew House. Of course there was a visit to Photo Source, a small camera shop in downtown Rochester run by Dick Raas. I have been hunting a 4×5 camera for a while and really wasn’t picky minus the fact it needed to be portable. Walking in, I bee-lined for the Large Format shelf and found a 1940s era Speed Graphic, but there was something a little odd about this camera. The Speed Graphic was the famous press camera of the mid-twentieth century. Dick proceeded to tell me about this one, it had been stripped down of all the things that made it a press camera, gone was the focal plane shutter, range finder, optical view finder. It had been basically turned into a field camera, came with a lens (Kodak Ektar 203mm f/7.7), film holders, basically everything I needed(and at the right price). I quickly ordered a 90mm lens off KEH.
Then it sat as it was pretty intimidating. I had never used a camera like this before – film came in sheets, loaded into holders, everything was upside down and backwards, closing the shutter, etc.
So I watched a couple videos on YouTube…
I then re-read Mat’s blog post about the basics of Large Format Photography, my confidence started to grow. One good thing was the film holders had old film in them so I practiced daily loading and unloading the film, putting them into the Unicolor Drum I got from Burlington Camera. So this past Saturday I finally loaded up four sheets of film (Ilford HP5), loaded a tripod, Spotmeter, blanket, both lenses and headed out. Before I even metered the scene I composed it in my head, then metered twice. Marked the spot, then went and got the camera, lined up the tripod, mounted the camera, opened it all up, blanket over the head and focused, recomposed, focused again. T I then set the exposure, checked again on the glass, mentally flipping everything. Then closed the shutter and loaded the film holder, double checked the shutter, pulled the darkslide, and pressed the release. Replaced the darkslide. Okay, that wasn’t too hard, despite being nervous as hell when I pressed the cable release. The second exposure went much better. There two shots down, and two more to go, but those I wanted to save for downtown Hamilton.
The next step of course was arranging developing. Working for a college I knew we had one traditional darkroom left on campus so I spoke to the technician in charge of running it and arranged for an evening to work there so that I could work outside the bag when loading the sheets into the drum. The drum at one point fell off the base (elastic bands are in order) sloshing some of the chemistry out causing some streaking on one of the negs.
Couple things I learned…especially when using my 90mm lens. I need to bring the lens forward a touch more as in the two images (I cropped them out in post) you can see the camera body (oops). To make sure no one is too close when exposing as they may bump into the camera and you get camera shake. And that the unicolor drum I’m using takes 300mL of chemistry, not 500. I’d also like to thank Mat, Sean, and Owen (From Sheridan College) for all their help in getting me started.
Long-time FPP listener Alex Luyckx works both in Information Technology support and as a freelance photographer. He describes himself as an analog photographer stuck in a digital world. He loves using cameras older than he is and long walks through abandoned buildings. Alex was a featured guest on Film Photography Podcast Episode 52. You can follow his photo blog at: alexluyckx.com/blog/
The Film Photography Podcast Store now stocks 4×5 film at the best prices on the web!! Thinking Large Format? Think FPP!